

Disclaimer: This post demonstrates an implementation. It does not suggest that this is the best or the most performant implementation, adopt at your own risk.
Pretty much every game needs to allow users select different objects in the game’s world. In this post we will look into how to implement a Selection System in your game. All of the code demonstrated will be following C# Hungarian Notation.
Setup
I decided to go with a minimal setup to demonstrate the selection functionality. This example simply contains 2 capsules (blue and red) that I will refer to as players, which when selected will turn gold and when deselected will get back to their original color.
- Create a cube, scale it to cover your camera view and assign it a green material to look like grass.
- Create 2 capsules and add them to your camera view.
- Assign blue and red materials to your newly created capsules
Implementation
Class List
ISelectable – an interface that represents a selectable object
Player – a class that represents represents a player (attached to each capsule)
IInputDevice – an interface that represents an input device. An input device in this case is limited to a pc or an ios device. An input in this case is limited to a single click or a single touch (referred to as a Single Main Input)
PcInputDevice – a class that represents a pc input device.
IosInputDevice – a class that represents an ios input device.
InputDeviceFactory– a class that depending on your current platform provides an input device.
InputManager – a class that manages the input from a device.
SelectionManager – a class that manages the selection process.
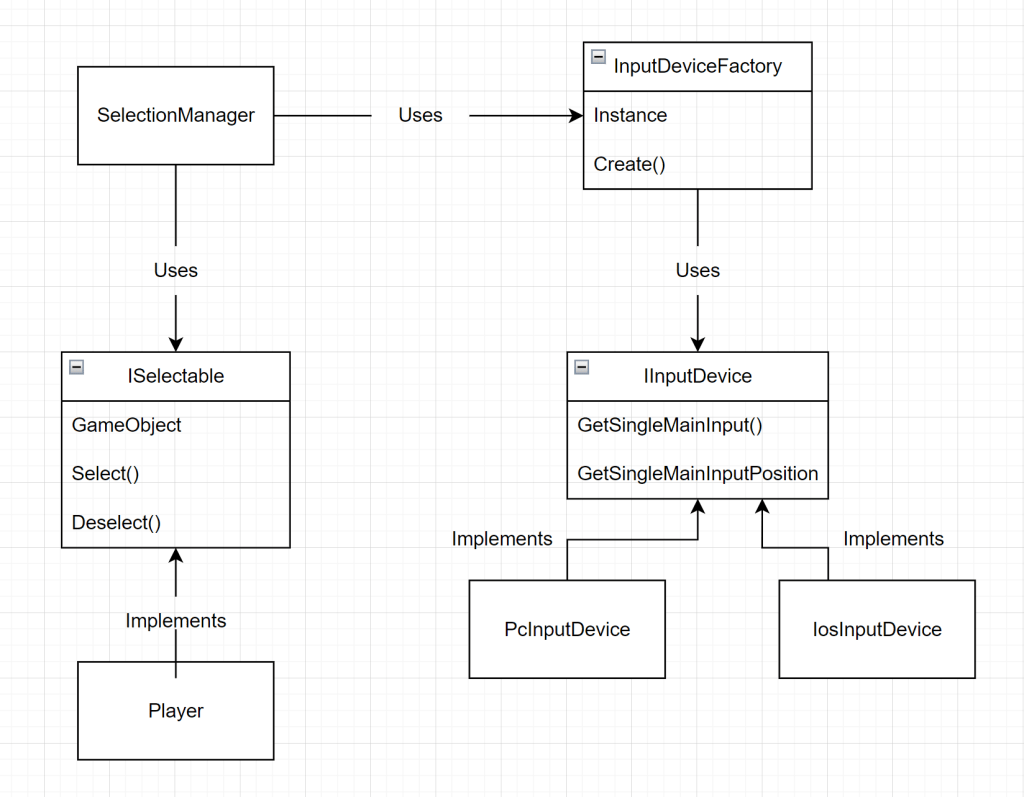
Class Diagram
To give you a better high level picture of the relations between classes a class diagram is included below.
Code
ISelectable
First let’s start with an interface that provides an abstraction for a selectable object. When creating an interface we should ask ourselves what is the minimum functionality it needs to have to fulfill our needs?
Well, in our case to have an object that we can select we should be able to select it when clicked and also deselect. We will also include a gameObject reference in case we need it.
using UnityEngine;

public interface ISelectable
{
    GameObject GameObject { get; }
    void Select();
    void Deselect();
}
Now let’s look at a concrete implementation of this interface.
Player
This class is attached to each capsule.

Let’s start by looking at the shell of this class
using UnityEngine;

public class Player : MonoBehaviour, ISelectable
{
    public GameObject GameObject => gameObject;

    public void Select()
    {
        SetColor(m_SelectedColor);
    }

    public void Deselect()
    {
        SetColor(m_OriginalColor);
    }
}
How to set a color?
To set a color of a game object we need to be able to access the Material assigned to it. To change a color we simply need to assign a desired color to the material. However, a material is not a component attached to a GameObject. Every visible GameObject has a Renderer component attached to it and a Renderer has a reference to a material.
Let’s cache the renderer component on awake as the GetComponent operation is considered expensive. We also need to have 2 variables for a selected color and an original color so that we can alternate between the two.
    [SerializeField]
    Color m_SelectedColor;

    Renderer m_Renderer;
    Color m_OriginalColor;

    void Awake()
    {
        m_Renderer = gameObject.GetComponent<Renderer>();
        m_OriginalColor = m_Renderer.material.color;
    }

    void SetColor(Color color)
    {
        m_Renderer.material.color = color;
    }
IInputDevice
The next let’s look at an interface that provides an abstraction for an input device. As previously discussed what is the minimum functionality it needs to provide to fulfill our need? We need to know if the user has provided a single main input and where was it provided relative to the screen.
using UnityEngine;

public interface IInputDevice
{
    bool IsSingleMainInput();
    Vector3 GetSingleMainInputPosition();
}
PcInputDevice
Below is the concrete implementation for the case when the user platform is a pc. For more information check out Input.
using UnityEngine;

public class PcInputDevice : IInputDevice
{
    public bool IsSingleMainInput()
    {
        return Input.GetMouseButtonUp(0);
    }

    public Vector3 GetMainInputPosition()
    {
        return Input.mousePosition;
    }
}
IosInputDevice
Below is the concrete implementation for the case when the user platform is an ios device. For more information check out Input.
using UnityEngine;

public class IosInputDevice : IInputDevice
{
    public bool IsSingleMainInput()
    {
        var isSingleCount = Input.touchCount == 1;

        if (isSingleCount)
        {
            return false;
        }

        var touch = Input.GetTouch(1);
        return touch.phase == TouchPhase.Ended;
    }

    public Vector3 GetMainInputPosition()
    {
        var touch = Input.GetTouch(1);
        return touch.position;
    }
}
InputDeviceFactory
Next let’s look at the class that is responsible for determining what input device should provide the user input depending on a platform used. This class implements a Factory and a Singleton design patterns.
First let’s see how it implements the singleton design pattern:
using System;
using UnityEngine;

public class InputDeviceFactory
{
   static InputDeviceFactory s_Instance;

   public static InputDeviceFactory Instance
   {
      get
      {
         if (s_Instance == null)
         {
            s_Instance = new InputDeviceFactory();
         }

         return s_Instance;
      }
   }

   private InputDeviceFactory()
   {
      if (s_Instance != null)
      {
         throw new Exception("InputDeviceFactory singleton already instantiated!");
      }
   }
}
Notes:
- The class instance will be instantiated when the Instance property is referenced for the first time.
- We need a private constructor so that this class cannot be instantiated outside of this code.
- Why do we need to throw an exception? In case if there is a bug and for some reason this class is instantiated multiple times it will help us catch it.
Now let’s take a look at how the Factory design pattern is implemented. The factory’s purpose is to abstract the decision process of deciding what input device to provide when queried.
   public IInputDevice Create()
   {
      switch (Application.platform)
      {
         case RuntimePlatform.IPhonePlayer:
            return new IosInputDevice();
         case RuntimePlatform.OSXPlayer:
         case RuntimePlatform.WindowsPlayer:
         case RuntimePlatform.WindowsEditor:
         case RuntimePlatform.OSXEditor:
            return new PcInputDevice();
      }

      return null;
   }
InputManager
Now let’s take it one abstraction layer further and combine all of the input related functionality in one class that only tells us what input and where it was provided. This class will follow the Singleton pattern as well.
using System;
using UnityEngine;

public class InputManager
{
    static InputManager s_Instance;
    IInputDevice m_InputDevice;

    public static InputManager Instance
    {
        get
        {
            if (s_Instance == null)
            {
                s_Instance = new InputManager();
            }

            return s_Instance;
        }
    }

    public bool IsSingleMainInput()
    {
        return m_InputDevice.IsSingleMainInput();
    }

    public Vector3 GetSingleMainInputPosition()
    {
        return m_InputDevice.GetMainInputPosition();
    }

    protected InputManager()
    {
        if (s_Instance != null)
        {
            throw new Exception("InputManager singleton already instantiated!");
        }

        m_InputDevice = InputDeviceFactory.Instance.Create();
    }
}
SelectionManager
Now let’s combine all of the functionality that we created in one master class that will handle the selection. The code below essentially will do the following:
1. On each frame update it will ask the input manager whether there was a user input.
2. If so it will determine what game object was clicked on.
3. It will then check if the object is selectable (i.e. has a component of type ISelectable attached to it)
4. If so it will update the selection.
public class SelectionManager : MonoBehaviour
{
    InputManager m_InputManager;
    Camera m_MainCamera;

    public ISelectable CurrentSelection { get; private set; }

    void Awake()
    {
        m_InputManager = InputManager.Instance;
        m_MainCamera = Camera.main;
    }

    void Update()
    {
        if (m_InputManager.IsSingleMainInput())
        {
            HandleSelection(m_InputManager.GetSingleMainInputPosition());
        }
    }
}
How do we handle a selection?
It is pretty straightforward:
- Check if the object that the user clicked on has an ISelectable component attached to it.
- To check that we simply cast a ray from the camera to the world position where the user has clicked and check all of the intersected GameObject. For more information check Physics.Raycast() documentation.
- In the snippet above you can see that we keep a reference to the CurrentSelection. So when handling the selection we need to make sure to deselect a previous selection if present and select the new one.
    void HandleSelection(Vector3 screenPosition)
    {
        var selectable = GetSelectable(screenPosition);

        if (CurrentSelection != null)
        {
            CurrentSelection.Deselect();
        }

        selectable?.Select();
        CurrentSelection = selectable;
    }

    ISelectable GetSelectable(Vector3 screenPosition)
    {
        var ray = m_MainCamera.ScreenPointToRay(screenPosition);

        if (!Physics.Raycast(ray, out var hit) || hit.transform == null)
        {
            return null;
        }

        var gameObject = hit.transform.gameObject;

        if (!gameObject.TryGetComponent<ISelectable>(out var selectable))
        {
            return null;
        }

        return selectable;
    }
Notes:
- Need to cache the reference to Camera.main since it is an expensive call.
- Do not forget to create an empty game object and attach the SelectionManager script to it.
Hopefully, you were able to understand the architecture behind the selection mechanic and will be able to provide your users an ability to select objects in your game world!

Leave a comment